BDD Product Care Card

This is the care card that is sent with each shipment outlining my recommendations for initial care for product longevity. Sedgwick leather really does need to be oiled prior to use and this card outlines my recommended product and guidelines for initial oiling. For those wanting to use the oil I recommend, I do package and sell the Effax Leder-Oil in 8oz jars complete with application brush for $14.

The card also discusses the rubber lined and rubber reins avoiding direct contact with petroleum-based products (like fly spray) to ensure longevity and keep them from becoming “gummy”.

LEATHER COLOR- Australian Nut vs. Havana

Here is a very clear example for those looking for guidance on which color product they would like. Because I recognize color choice is important, I offer both options in all products. I even get many of my product offerings in Black on special request. If looking for a color option outside those listed, please feel free to reach and and inquire. I have gotten other colors like Conker on special occasions. No additional cost, but a 50% deposit is required for special order items.

Australian Nut is a medium brown color with red undertones. It will darken slightly on oiling. Australian nut will always be lighter than Havana and will always have a red hue to it. In the picture Australian Nut (often referred to as A-nut) is on the left.

Havana is a darker chocolate brown color. I often refer to it as looking like a Hershey’s chocolate bar. The noseband on the right in the picture is Havana.

Bridle Fitting Guide

Review the measurement chart, photos, and guiding points below when measuring for a BBD bridle. Please reach out with any questions – I am happy to help! šŸ˜Š

IF YOU ARE ABLE TO SEND ME A SIDE PHOTO OF THE HORSE WEARING THE BRIDLE YOU USED TO TAKE THE MEASUREMENTS FROM, THAT CAN BE EXTREMELY HELPFUL AS WELL

I am always happy to assist with fitting guidance at NO EXTRA CHARGE if you are able to send me these 6 measurements and a photo of the horse wearing the bridle used for the measurements.

The SIX most important measurements are the

  1. The split to split on the current CROWNPIECE (that is the area that goes across the horse’s poll. The split on a bridle is where the wider piece that goes across the poll ā€œsplitsā€ into the tab for the cheekpieces and throatlatch and on my bridle the noseband as well. So from the split on the one side over the poll to the split on the other side.
  2. BROWBAND from the inside not including the loops that the crown goes through.
  3. The THROATLATCH from the crown split to the end of the throatlatch.
  4. The length of the HEADSTALL (cheeks and crown) starts at the bit, and runs over the top of the head to the bit on the other side.
  5. The circumference of the NOSEBAND from the tongue of the buckle to the most used hole.
  6. The distance between the NOSEBAND uprights.

Small
Pony
Regular
Pony
Large
Pony
Cob Horse Oversize
Crownpiece 11″ 12″ 13″ 13ā€ 14″ 15″
Browband 11″ 11.5″ 12″ 12.25″ 13.25″ 14.25″
Throatlatch (longest/shortest) 22″/19″23.5″/21″23.75″/20.25″ 24″/21″ 27″/24.5″29.5″/26.5″
Headstall (longest/shortest)34.5″/28.5″
33″/27″
39.75″/34.5″
38″/32″
39.75″/34.25″
37.25″/32.5″
40″/34.25″44″/38.25″50″/43.5″
Noseband (longest/shortest)23″/19.5″ 25″/21″ 25.25″/21.5″26″/21.5″28.25″/23.5″29.75″/26.25″
Noseband Width-
Distance between uprights
10″ 10″ 11″ 12″ 13″ 14.5″

How to Take Each Measurement

CROWNPIECE

  • Measure the split to split on a current crownpiece (the area that goes across the horse’s poll)
  • Hold your measuring tape at the top of the split on one side, run the tape over the poll, then stop at the top of the split on the other side
  • Split on a bridle: where the wider piece that goes across the poll ā€œsplitsā€ into the tab for the cheekpieces/throatlatch

BROWBAND

  • Take the measure on the inside of the browband – NOT including the loops used to fasten the crown

THROATLATCH

  • Measure from the crown split to the end of the throatlatch
  • Split on a bridle: where the wider piece that goes across the poll ā€œsplitsā€ into the tab for the throatlatch

HEADSTALL

  • Measure the length of the headstall (cheeks and crown) starting at the bit
  • Go over the top of the head, to the bit on the other side

NOSEBAND CIRCUMFERENCE

  • Measure the circumference from the tongue of the buckle to the most used hole
  • Split on a bridle: where the wider piece that goes across the poll ā€œsplitsā€ into the tab for the noseband

NOSEBAND WIDTH

  • Measure the distance between the Noseband Uprights

Sidesaddle Terminology

Sidesaddle, like most things, comes with its own terminology and “stuff”. Check out the BRIEF descriptions of commonly used terms below.

Saddles, Tack

  • Balance Strap: This leather strap buckles like a girth near the stirrup iron, runs on top of the regular girth (under the horse’s belly) and attaches toward the back of the saddle on the other side of the saddle. When riding aside it is an important piece of tack that enhances safety for the rider and a more comfortable experience for the horse.
  • Chape: The piece of material (leather, nylon, etc.) that goes around a buckle and is stitched to the main body of the tack. Think – how the buckles are attached to your girth.
  • Fixed Head: The protruding piece on the top of any sidesaddle (compared to the one below it). This piece is fixed to the sidesaddle and should never wiggle or move.
  • Leaping Head: The protruding piece under the Fixed Head of a sidesaddle. This piece can often be unscrewed/removed easily in order to be replaced or reshaped to fit the rider’s thigh.
  • Near-side Sidesaddle: The more commonly seen style of sidesaddle, this saddle has the leaping and fixed head on the left side of the horse’s body, meaning the rider’s legs fall to the left side of the horse.
  • Off-side Sidesaddle: A less common style of sidesaddle, this saddle has the leaping and fixed head on the RIGHT side of the horse’s body, meaning the rider’s legs fall to the RIGHT side of the horse. It never hurts to note that off-side saddles require a special apron for the rider.
  • Tri-Fold Girth: A girth that attaches to the saddle with two buckles on both ends, just as many modern girths do. The difference is that a Tri-Fold is a thinner piece of leather folded three times, then stitched together. This is the construction method historically used to make a grith and is most appropriate in historical presentation-type situations.
  • Plaited: A style of leather work where the leather is braided as opposed to in one piece.
  • Queen: Used to help position the right thigh (in a near-sided saddle, left in an off-side saddle) into the proper place to allow for a comfortable and correct position. Typically fits over the fixed head of the sidesadde and buckles under the leaping head iron. 
  • Sidesaddle Iron: the stirrup! With a sidesaddle there is only one “iron” as opposed to two “stirrups”.

Rider, Attire, Events, Etc.

  • Appointments Class: A common class offered when showing sidesaddle, the Appointments Class is a flat class (walk, trot, canter) that requires you to emulate the historical turnout of a lady in the hunt field. Carrying a hunt whip, rain gloves, and a sandwich case are just a few of the requirements. It is imperative to read the USEF rulebook for the full requirements and description of the class if you are interested in competing.
  • Aside vs Astride: when you are riding in a sidesaddle it is called “riding aside” – you have both legs on one side of the horse. The opposite would be “riding astride” – with one leg on each side of the horse.
  • Apron: The “skirt” worn when riding aside; it covers the legs and waist. Historically it was to preserve the ladies’ modist appearance and keep her warm while out hunting.
  • Habit: The outfit worn by a sidesaddle rider – typically refers to the apron (skirt) and jacket.

Please note – this list is a work in progress. If you think of a term worth defining – drop me a note!

Gloves: USEF Ladies Sidesaddle Appointments

As many of you know, I LOVE educating people on the required appointments for the USEF ladies’ sidesaddle appointments classes. Today I am going to discuss gloves.
Ā 
Here is the exact wording from HU148
11. Gloves: Plain; heavy wash leather or brown leather gloves.
12. Rain Gloves: White or light-colored rain gloves. Should be carried on off (right) side under billets and just showing in front of saddle flap: fingers forward, thumbs in.
Ā 
Iā€™m not sure who assisted with the wording when the rules were rewritten a few years ago, but they werenā€™t as careful as they should have been. While the use of an offside saddle is rare- they are used, and the wording doesnā€™t take them into consideration. Anyway- like many others, I was taught your gloves should be brown. And I wore brown gloves in my early days. After learning more about the history and correctness of the attire over the years did I realize that the brown gloves you often see arenā€™t truly correct. But they arenā€™t
wrong either – they are brown!
Ā 
Ā 
The most correct and formal gloves are the chamois or wash leather gloves as pictured to the left.
Ā 
To be truly accurate, the gloves should be chamois with buttons and no elastic or Velcro. But those are hard to find, and let me tell you from experience that even though they are lovely, they shed white fuzz all over your dark Melton wool apron. Donā€™t do it!! It took me hours to clean my habit after I showed at one of the big shows with my actual vintage chamois gloves. I have found a few modern makes that are VERY close in color and look the part without making a mess and are super simple to keep clean.
Ā 
I use light leather chamois-looking gloves when wearing formal attire, and wear the darker tans for my informal attire. I have pictured the darker chocolate brown color as a reference. The problem with these gloves is they look black from a distance and black is for mourning only so wouldnā€™t have been worn and are not correct per the rules. But, these darker brown gloves are allowed per the rule book and are preferred by several of the ladies as your hands arenā€™t as noticeable when wearing darker gloves.
Ā 
Ā 
Ā 
Ā 
Ā 
Ā 
Ā 
Ā 
Ā 
Ā 
Ā 
Ā 
The other gloves you need to be aware of are your rain gloves (pictured above – far right). These are the knit string gloves typically worn in wet weather to help aid with grip on wet leather. They are referred to as rain gloves for this reason. On a near-sided sidesaddle, they are carried on the offside under the billets to keep them safe and easily accessible by the rider. Many times in pictures from the offside you can see the fingers of the gloves peeking out from the offside flap of the saddle. These are either white or ecru (which is a yellowish-tan color, or unbleached linen color). These gloves arenā€™t actually worn so size isnā€™t as critical. I like to carry the small size under my regular flap saddles and the XS or XXS on my show flap saddles. They seem to fit the best!
Ā 
If anyone needs a pair of rain gloves feel free to reach out to me. I do stock them since they are getting increasingly harder to find at a reasonable cost.
Ā 
As always, please ask questions – I am always happy to help!

The Illsley Foam Rubber Seat on a Sidesaddle

Do you have a side-saddle that the seat feels like it is filled with fish tank gravel? (That is the best description I can come up with!)

It is/was likely the Illsley Foam Rubber Seat – felt similar to memory foam in its original state.

I have a Whippy with a very soft Illsley seat and itā€™s a dream to sit in. They have to be cared for in a specific way or they dry out. Iā€™ve only ever seen the one I have that is still soft.

Another clue is often the red dust coming out of the cracks around the fixed head. As you can see in the picture the foam is a reddish-orange color.

My Whippy is starting the long process of being rebuilt. It is going to be a practice for me in many aspects. The first is how to carefully remove this old material. I have heard from others who have done it that it is no fun at all, but I do love these saddles and this is one that was kindly donated to my education, so no rush or pressure.

Just thought I would share in case anyone wondered why their seat feels a certain way. I have seen this much more frequently on Whippy saddles but have also witnessed on other makes as well. Just overwhelmingly on Whippyā€™s.

A Wykeham Pad on a Sidessaddle

This pad was patented in 1904 and apparently was rather popular when first introduced. It works really well on the wide flat-backed horses.

Unfortunately, it isnā€™t a great solution for the A-framed-shaped TB types we typically see here in the US. This is why it isnā€™t an easy answer for a saddle that is missing its panel.

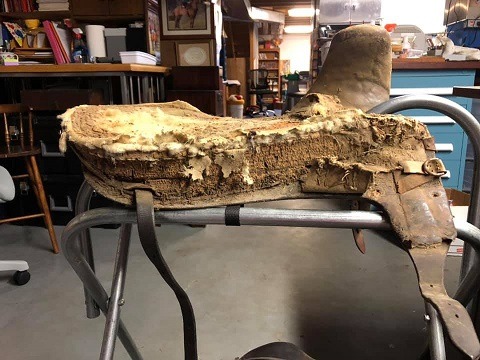
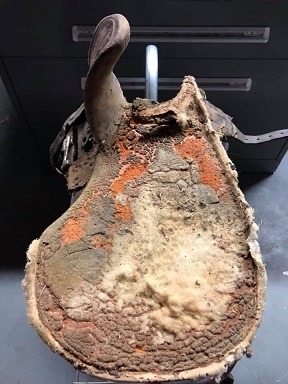
These pads need to be custom-made and shaped to each horse, and while shims can be sewn to them (as seen on this pad) they arenā€™t able to be altered like the flock in a wool paneled saddle.

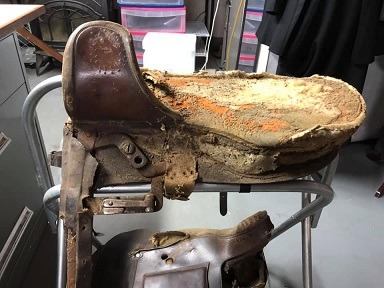
These pads did have a channel down the middle (with ventilation holes as seen in the pictures) but as you can imagine- there isnā€™t the spine clearance on these as you get with the wide gullets found on our modern saddles.

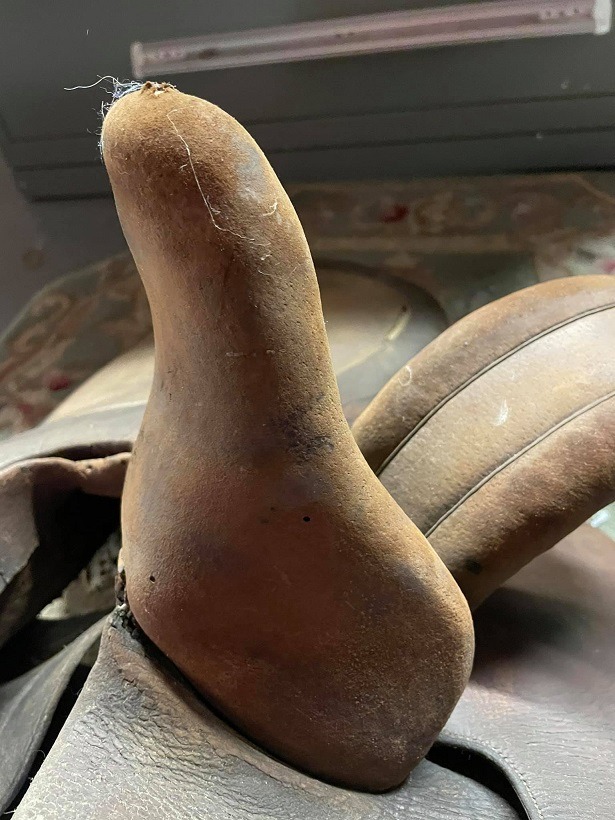
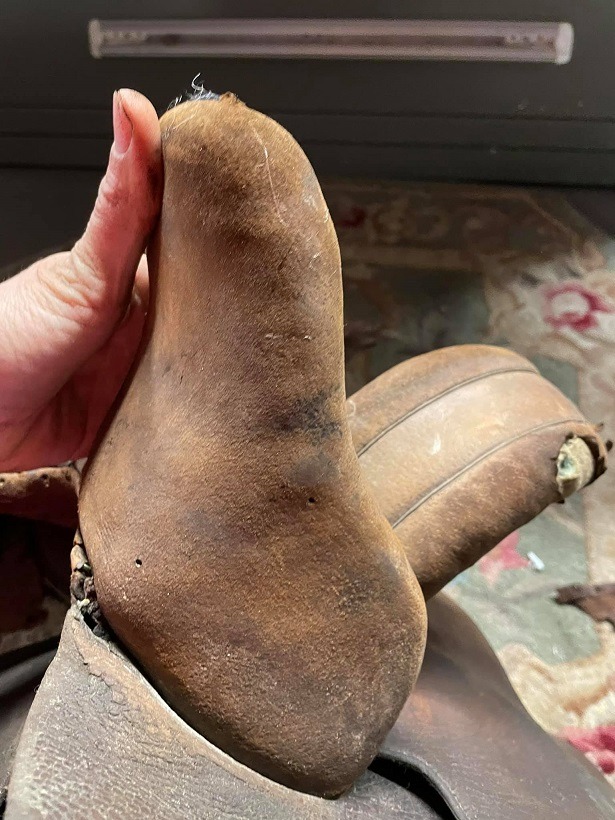
One nice feature was the ability for a lady to have a saddle top that fit her well, and then numerous different Wykeham pads for her different horses. These pads were relatively easy to swap out with the points of the saddle sliding into the leather pockets as seen in the pictures.

A tab that attached at the cantle and then a few other buckles for securing them together. And no you arenā€™t crazy- this is a Wykeham for an offside saddle.

This particular pad has had linen attached to it to give the appearance of panels. I donā€™t know when or exactly why this was done (I purchased it this way) but that was commonly done to give the appearance of a panel.

These Wykeham pads were also made for astride saddles, but I have only ever seen the side-saddle version.

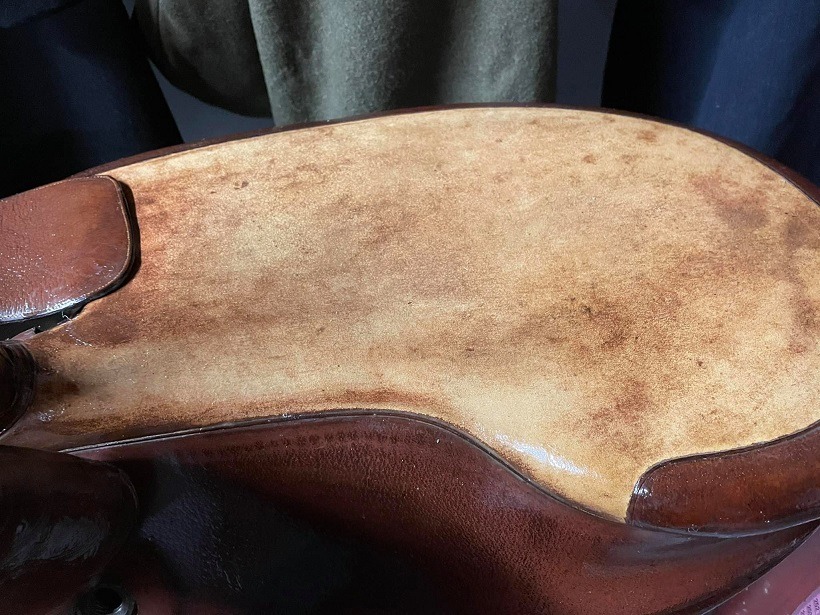
The two pictures below are of a traditional wool panel off the saddle. I included them for comparison purposes.

Hope that information is helpful to explain when and why these may be a good or not-so-good choice for a saddle that happens to be missing its ā€œbottomā€.

Sidesaddle Stirrup Assembly – Buyer Beware

When things arenā€™t what they appear…

I glanced at this saddle (image below) that was recently on the market and noticed something not quite right about the stirrup assembly. Itā€™s backwards!

This is backwards on a near-sided saddle. So if it were my saddle, I would be sure to use a safety iron with it.

Now this isnā€™t something that everyone would notice, but to someone who handles these saddles on a regular basis, itā€™s glaringly obvious. The reason I point this out is because there is a safety issue with it and a solution for it, but someone needs to be aware of it.

The solution is simple- you need to treat this like it is a roller fitting and not a safety fitting. So use a safety iron. I have included a picture of the correct orientation so people can understand how the Mayhew patent works – see below.

If the lady goes backwards or to the offside- the bar would open under her weight and the entire safety fitting leather and iron would be released from the saddle. She wouldnā€™t get hung up in the iron and potentially drug. Itā€™s why these safety mechanisms were invented and used. Some work better than others but they all are for safety purposes.

With this pointing the opposite way than was intended it would not necessarily open thus creating a potential drag situation if the rider’s foot were to get trapped in the iron.

I hope these examples are educational – sometimes we need to pay particular attention to the small details to be sure we are as safe as we think we are.

Above is the correct orientation and the way the safety assembly was intended to be used.

The Blocked Head on a Sidesaddle

This is the fixed head off of a 1908 Champion and Wilton sidesaddle. Sadly this saddle is beyond repair (yes there is such a thing) but I spent the money and bought the remains of it for the example of a blocked head.

Per Nick Creaton, the blocked head was developed in 1892 and improved upon in 1893 along with the split-flap design. I have only ever seen these heads on C&W saddles (with one exception), and Roger Philpot once told me if you see one you can be assured the saddle was from around the 1912 timeframe (1900-1920 when I asked for a reference). I donā€™t know why they werenā€™t seen much after that. It actually was a pretty neat concept but I imagine many didnā€™t find it appealing.

The one exception is a lovely 1923 saddle built by an independent saddler on a Hunter & Son tree. It was sold to me as a C&W but it wasnā€™t. But it was still a lovely saddle and is in use by a wonderful member of our sidesaddle community. I will admit recently reaching out to her asking her to contact me if itā€™s ever for sale again – I liked it that much!

Anyway, the blocked head offers a nice support to the right calf region to allow added stability, especially over a large fence. More surface area to press the leg against equals greater points of contact which should equate to greater stability. I did find this to be the case, but many others I have asked who have ridden in blocked head saddles didnā€™t notice a difference. A lovely feature that likely added hours of skilled labor to the production of the saddle itself. A beautiful example of craftsmanship in my opinion.

I know some saddles like the one above really canā€™t go back into circulation for use due to the damage to the tree and metalwork but I am slowly building an educational collection and would love to have examples of the various features to share at events like Camp Leaping Horn. If you have pictures or own an example I would love to hear from you – email me.

The Doeskin Seat on a Sidesaddle

A person reached out to me asking how to care for her doeskin seat that appears to be wanting to crack.

She said it does feel dry but didnā€™t want to put anything on it.

I understand this concern!!!!! You donā€™t want to ruin it, but if it feels like paper, it does need conditioning.

The following is what I do. Itā€™s not perfect but it has worked for me on many occasions:

I recently acquired a beautiful Owen with a dry seat. The seller told me it was dry and I knew I could help it. Itā€™s a slow process and the worst thing you can do is ride in a seat that is dry. It will crack and tear.

Personally, my favorite product for the doeskin is the CWD conditioner. Yes, I know itā€™s $30 a jar… and they charge a ridiculous amount for shipping, but I stock up on Black Friday when they typically have their things on sale. It is a creme gel that in my experience darkens the doeskin the least. I have trialed other products, but this is my favorite for this purpose. Some have asked my 2nd favorite. Effax conditionerĀ in the brown tub container.

I do several coats with my fingers rubbing it in circles on the seat and the heads. One perk of doing this in the winter is my hands can usually use moisturizing as well!

I let it sit for several days between coats and then will ride in the saddle even with the conditioner on it.

After I have ridden in it and I feel it is more supple then I will clean it with leather therapy and a credit card to scrape the yuck off if I feel it needs it. Not all saddles need it but if it has so much dirt and conditioner accumulated that it feels like a leather seat, itā€™s best to clean it.